Showing posts with label Custom Daisy Red Ryder. Show all posts

Sunday, March 11, 2018

Some new Pix

Works in progress.


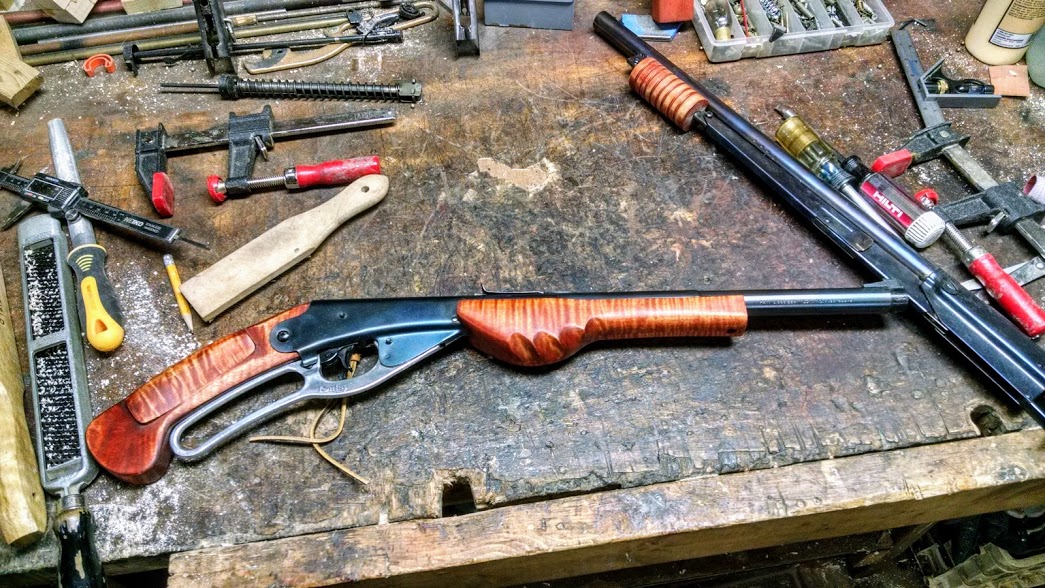
I've pictured this Model 25 before and was not happy with the stock I made to the factory pattern. It now has a glue up curly maple stock that is being roughed out for finger grooves. I think it'll finish up nice.


Same gun, different angle.


This is a salvaged Model 1938B Daisy Red Rider not more than 10 years old. I picked it up a at local yard sale for a buck because of it having a flattened muzzle due to a unspecified garage mishap. It's morphed over the years from a rude and  crude hacksaw Mare's Leg to it's current state. It's fireblued, in possession  of a classic cast aluminum lever and super jazzy curly maple grip and finger grooved forearm. Shoot's well too.


The shop rack. These are mostly done. I do cap guns too.

That's all for today.

Wednesday, February 28, 2018

Red Ryder 3 is done (ish)


Red Ryder #3 is Daisy Model 94 Red Ryder Carbine that got rode hard and put up wet. A number of times. This one survived a crushed receiver, a failed mainspring support that was replaced by a 16 penny nail that over time bent into a pleasant "U" shape and the worst pitting I've seen so far.


It's also missing the signature latigo loop and supporting hardware as well as the the flip over peep sight/v-notch rear sight. The existing rear sight bracket does have a notch filed into it for your convenience, not a factory solution but it does work. There are also two small holes drilled into the rear of the receiver to aid in butt retention or something. This photo gives some clues as to the abuse this Red Ryder has endured.


The stocks are glue-up curly (ish) maple. They are not as vibrant as I had hoped but that is the nature of wood. This side shows some more of the waffly nature of the receiver. Still and all, the little gun shoots and has enough power for range events but does not fare well in a "Cut to Can" match.


This is the bottle cap after filing and fire bluing. An excellent example of why you're supposed to wipe everything down before making photos.


Here's a group shot of the Red Ryder gang. From the top, a Model 94 Red Ryder Carbine missing a few bits, #2 is a #111 Model 40 Rest-o-mod Red Ryder and #3 a complete Model 94 Red Ryder Carbine.

I've got a Model 111 on the bench at the moment and rustled up yet another Model 94 receiver  with no internals as well. That'll top the Red Ryder Bottlecap gang out at 5.

Until I happen upon number 6.

Wednesday, February 21, 2018

Red Ryder #2 is done


Red Ryder #2 is off the bench and in the rack. Here are some pictures of the effort.


As you can see this is sporting my new Martini style cocking lever, it's also got a .250 thick all steel trigger that is finished bright but due to my deplorable 'Photo Stand' it looks blue. It's not, it's silvery shiny. The stock on #2 is a two piece glue up from roughly 1" thick curly maple. I like this style stock because it adds heft to these little guns and helps them really stand out.


I also hand file the bottlecaps to remove dents and dings and highlight the bronze ring around the bore. Not needed but much better appearance.


This is a view of the buttplate. All my Daisy rest-o-mods have buttplates. They're fire blued like all the other bits and do help keep the guns from getting damaged.


Here's the roll stamp lightly highlighted by some gold stick.

Red Ryder #3 is in process and should be finished by the weekend. I'll post when it's done.

Monday, February 19, 2018

Building better mousetraps or at least a old school Daisy lever


What do you do when you want an old school Daisy lever that's not curved? Make one.
 
I have a preference for straight grip musket style stocks on the the Daisy's I rest-o-mod and they are not common on the Red Ryder platform in any vintage. Nor are they readily available on any of the internet parts sites.

Since all the cast aluminum levers I've come across are a pretty uniform 1/4" thick I decided to head over to the local big box and pick up some 1/4" x 2" steel. It's plenty strong enough to fabricate a BB gun lever.

I've also had misgivings about the traditional lever shape on the Daisy's because during a speed shooting event like 'Cut the Can' you never get back to a full grip as you're blasting BB's as fast as humanly possible to reduce that aluminum soda can to two chunks. The top of the lever gets in the way. I've also wondered what increasing the lever length might do for improving the reload cycle.
So I found out.

Pretty damn jazzy. The lack of a traditional loop gets my hand back into firing position after reloading and cocking the beast. The Martini style loop gets kicked out by my firing hand thumb and then palmed as I rock the muzzle to cock the beast and then on to the next shot. Nice and fluid.

And unique.

Next post is all about triggers. Well not all about them, just the ones I make on occasion.